정적 컨텐츠
스프링 부트는 정적 컨텐츠를 제공하고 있습니다
Spring Boot Features
Graceful shutdown is supported with all four embedded web servers (Jetty, Reactor Netty, Tomcat, and Undertow) and with both reactive and Servlet-based web applications. It occurs as part of closing the application context and is performed in the earliest
docs.spring.io
여기에 접속하면 7.1.5. Static Content 부분을 볼 수 있습니다.

resources - static 에 아무 파일이나 새로 만들어보겠습니다
저는 hello-static.html을 만들어 아래 내용을 넣어주었습니다
<!DOCTYPE HTML>
<html>
<head>
    <title>static content</title>
    <meta http-equiv="Content-Type" content="text/html; charset=UTF-8" />
</head>
<body>
정적 컨텐츠 입니다
</body>
</html>

localhost:8080/hello-static.html에 접속하면 출력이 됩니다.
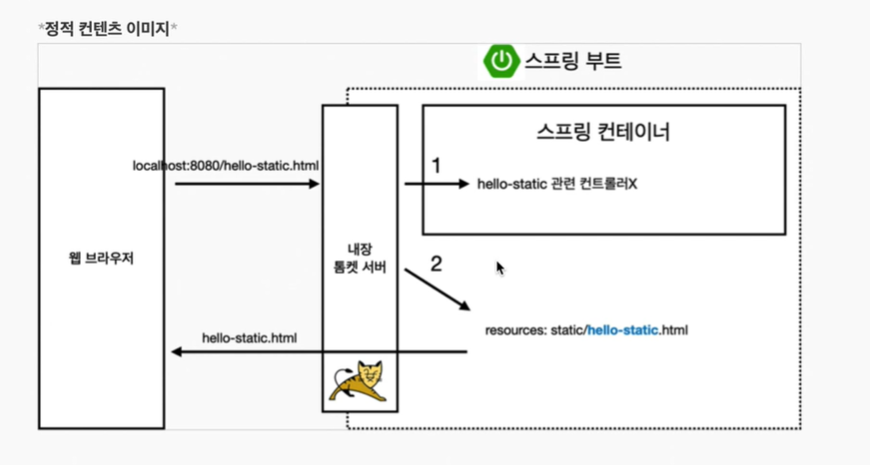
1. locathost:8080/hello-static.html을 입력
2. 내장 톰캣 서버가 요청을 받고 스프링 컨테이너에 넘겨줍니다 스프링 컨테이너는 우선 hello-static 관련컨트롤러가 있는지 찾아봅니다 (컨트롤러가 먼저 우선순위를 갖는다는 의미)
hello-static이라는 컨트롤러가 없었다
3. 스프링 부트는 resoutces: static/hello-static.html을 찾습니다
4. 있으면 다시 웹 브라우저로 반환을 해줍니다
MVC와 템플릿 엔진
MVC : Model, View, Controller
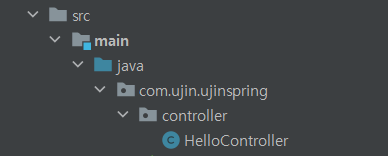
기존에 만들어둔 controller - HelloController 에 이어서 작성해보도록 하겠습니다
package com.ujin.ujinspring.controller;

import org.springframework.stereotype.Controller;
import org.springframework.ui.Model;
import org.springframework.web.bind.annotation.GetMapping;
import org.springframework.web.bind.annotation.RequestParam;

@Controller
public class HelloController {

    @GetMapping("hello")
    public String hello(Model model){
        model.addAttribute("data", "hello!!");
        return "hello";
    }

    @GetMapping("hell-mvc")
    public String helloMvc(@RequestParam("name") String name, Model model) {
        model.addAttribute("name", name);
        return "hello-template";
    }
}
이렇게 작성이 완료되었습니다.

templates - hello-template를 만들어줍니다
<html xmlns:th="http://www/thymeleaf.org">
<body>
<p th:text="'hello ' + ${name}" >hello! empty</p>
</body>
</html>
hello-template에 들어있는 내용입니다.

localhost:8080/hello-mvc?name=spring!이라고 입력한 출력결과입니다
1. name=spring!이라고 입력
2. controller - HelloController 에 있는 String name이 spring!이라고 바뀜
3. 16번 째 라인의 name도 spring!이라고 바뀜
4. return "hello-template"를 함
5. ${ name } 에 spring!이 들어감
5. 출력됨

1. 웹 브라우저에 locathost:8080/hello-mvc를 넘기면 스프링 부트가 띄울 때 같이 띄우는 내장 톰캣 서버를 거친다
2. 내장 톰캣 서버는 스프링 컨테이너에 hello-mvc가 왔다고 넘긴다.
3. 스프링은 helloController에 매핑이 되어있는 것을 인지하고 그 메서드를 호출한다
4. 그리고 return을 하는데 그때 hello-template으로 스프링에 넘겨준다
5. 스프링은 viewResolver라는 화면과 관련된 해결자를 동작시키는데, hello-template라는 같은 이름을 가진 파일을 찾아서 템플릿 엔진이 처리를 한다
6. 탬플릿 엔진은 html로 변환을 하여 웹브라우져에 넘긴다
정적일 때는 변환을 하지 않았지만
탬플릿 엔진일 때는 변환을 해서 웹브라우져에 넘겨주었다
@GetMapping("hello-string")
@ResponseBody
public String helloString(@RequestParam("name") String name){
    return "hello " + name;
}
controller - HelloController에 위에 내용을 추가해줍니다

소스 코드를 확인해도 html 태그는 나오지 않습니다
입력한 문자가 그대로 return되는 것입니다
API
@GetMapping("hello-api")
@ResponseBody
public Hello helloApi(@ResponseBody("name") String name){
    Hello hello= new Hello();
    hello.setName(name);
    return hello; // 객체 넘김
}

static class Hello {
    private String name;

    public String getName(){
        return name;
    }

    public void setName(String name){
        this.name = name;
    }
}
templates - HelloController.java 에 위 내용을 추가해줍니다

JSON 방식
(간단하게) { key : value } 로 이루어진 구조

1. ResponseBody가 hello 객체를 넘기면 객체의 몇 가지 조건을 보고 HttpMessageConverter를 동작시킨다
Http의 BODY에 문자 내용을 직접 반환
2. viewResolver 대신에 HttpMessageConverter가 동작
3. 기본 문자이면 StringConverter가 동작하게 되고 기본 객체이면 JsonConverter가 동작한다
3. (JsonConverter가 동작) Json 스타일로 바꾸고 웹 브라우저에 보낸다
끝!
'Spring' 카테고리의 다른 글
| 회원 관리 예제 - 웹 MVC 개발 ( 회원 웹 기능 - 홈 화면 추가 | 등록 | 조회 ) (0) | 2022.01.25 |
|---|---|
| 스프링 빈과 의존관계 ( 컴포넌트 스캔과 자동 의존관계 설정 | 자바 코드로 직접 스프링 빈 등록하기 ) (0) | 2022.01.24 |
| 회원 관리 예제 2 - 백엔드 개발 ( 회원 서비스 개발 | 회원 서비스 테스트 ) (0) | 2022.01.21 |
| 회원 관리 예제 1 - 백엔드 개발 ( 비즈니스 요구 사항 정리 | 회원 도메인과 리포지토리 만들기 | 회원 리포지토리 테스트 케이스 작성 ) (0) | 2022.01.20 |
| 프로젝트 환경 설정 ( 프로젝트 생성 | 라이브러리 살펴보기 | View 환경설정 | 빌드하고 실행하기 ) (0) | 2022.01.19 |