🍑 context
@ 어노테이션 설정을 사용하려면 context 네임스페이지를 추가해야 합니다
네임스페이스 : 별명 덩어리
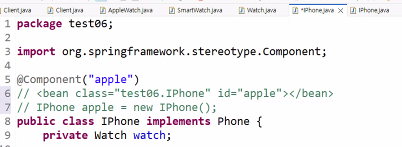
@Component("apple")
// <bean class="test06.IPhone" id="apple"></bean>
// IPhone apple = new IPhone();
3번 라인 한 줄로 new 까지 된다
🍑 설정 파일 변경된 코드
변경 전 🔽
<?xml version="1.0" encoding="UTF-8"?>
<beans xmlns="http://www.springframework.org/schema/beans"
       xmlns:context="http://www.springframework.org/schema/context"
       xmlns:xsi="http://www.w3.org/2001/XMLSchema-instance"
       xsi:schemaLocation="
        http://www.springframework.org/schema/beans
        https://www.springframework.org/schema/beans/spring-beans.xsd
        http://www.springframework.org/schema/context
        https://www.springframework.org/schema/context/spring-context.xsd">

   <bean class="test06.IPhone" id="apple">
      <constructor-arg ref="aw" />
   </bean>
   <bean class="test06.GalaxyPhone" id="galaxy">
      <property name="watch" ref="sw" />
   </bean>

   <bean class="test06.AppleWatch" id="aw" />
   <bean class="test06.SmartWatch" id="sw" />
</beans>
| 항목 | apple | galaxy |
| 주입 방식 | 생성자 | setter |
| 주입 대상 | AppleWatch | SmartWatch |
| XML 태그 | <constructor-arg> | <property> |
| 안정성 | 높음 | 유연 |
[ 코드 뜯어보기 ]
<bean class="test06.IPhone" id="apple">
    <constructor-arg ref="aw" />
</bean>
IPhone 객체 생성 시 AppleWatch를 생성자에 바로 전달
이전에는 AppleWatch aw = new AppleWatch() 이렇게 사용
변경 후 🔽
<?xml version="1.0" encoding="UTF-8"?>
<beans xmlns="http://www.springframework.org/schema/beans"
       xmlns:context="http://www.springframework.org/schema/context"
       xmlns:xsi="http://www.w3.org/2001/XMLSchema-instance"
       xsi:schemaLocation="
        http://www.springframework.org/schema/beans
        https://www.springframework.org/schema/beans/spring-beans.xsd
        http://www.springframework.org/schema/context
        https://www.springframework.org/schema/context/spring-context.xsd">

   <bean class="test06.AppleWatch" id="aw" />
   <bean class="test06.SmartWatch" id="sw" />
</beans>
🍑 context:compoent-scan
이 패키지 안을 싹 훑어서 @Component 붙은 클래스는 내가 알아서 bean으로 만들게
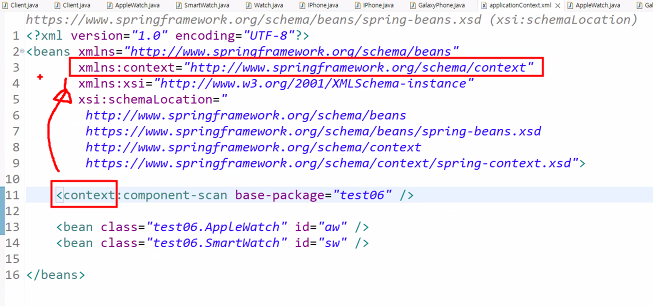
패키지를 test06만 보라고 알려주기 위해
test06 패키지 아래에 있는 클래스들 중
@Component 붙은 애들 전부 스프링 컨테이너에 등록해
<< new를 대신하는 bean을 대신하는 어노테이션 컴포넌트 >>
의존할 대상 위에 @Autowired를 붙이면 된다
스프링 컨테이너에게 “여기 필요한 객체 좀 자동으로 넣어줘” 라고 부탁하는 표시
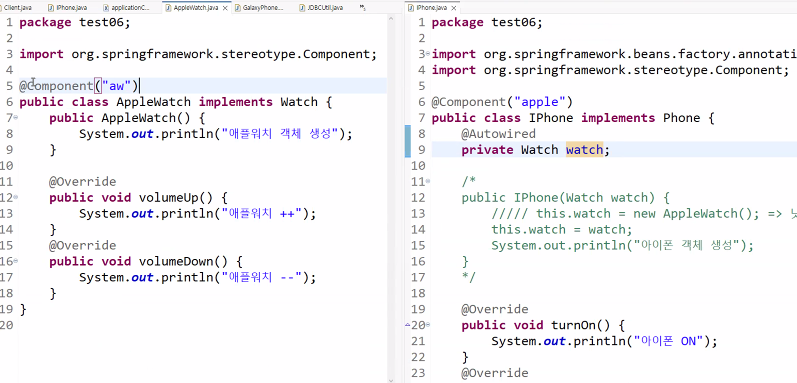
@Autowired 는 DI해줭~~인데 그치만 객체생성을 해주는 것은 아니기 때문에
bean태그 대신 @Component("aw") 이런식으로 해줘야 한다
@Component는 자료형을 판단하는 능력이 있기 때문에 옆에 () 이름을 안붙여도 안다
인터페이스 == 자료형 == 클래스
위에서는 애플워치에만 @Component를 했는데
애플워치에 @Component, 스마트워치에 @Component를 하면 에러가 난다
둘 중 어떤 놈을 @Autowired 해야 하는지 모르는 상태이기 때문이다
.xml은 컴파일에 들어가지 않는다 == 컴파일 비용이 안든다
- 하이브리드 방법 : @Component 에 이름이 없고, bean 객체 생성을 주석달고 지우면서 확인하는 방법
- 부트 방법 : @Qualifier 어노테이션으로 해결할 때는 @Component 컴포넌트에 이름을 무조건 붙여야 한다
| 어노테이션 | 역할 | 한마디로 | 어디에 붙이나 |
| @Component | Bean 등록 | “이 클래스 스프링이 관리해” | 클래스 |
| @Autowired | 의존성 주입 | “이거 자동으로 넣어줘” | 생성자 / 메서드 / 필드 |
| @Qualifier | 주입 대상 지정 | “이 중에서 이거!” | 주입 위치 |
@Autowired
스프링 컨테이너에 있는 Bean 중에서 타입에 맞는 객체를 자동으로 찾아서 주입해주는 어노테이션
우리가 xml에서 <constructor-arg>, <property> 를 코드로 바꾼 것
@Autowired가하는 일을 쉽게 표현하면
이 자리에 필요한 부품을 스프링이 알아서 찾아서 끼워줘~ 하는 거다
@Autowired
private Watch watch;
만약 이런 코드가 있다면
나는 Watch가 필요한데 어던 Watch인지 몰라도 됨
가게(스프링 컨테이너)에 있는 거중에 Watch 하나만 골라서 넣어줘인 것이다
@Autowired는 결국 기존 자바에서 하던
this.watch = watch; 이 대입을
스프링이 대신 해주는 것이다
@Qualifier
@Qualifier는 @Autowired가 여러 개의 후보 Bean 중에서 "이 이름의 Bean을 써라" 하고 정확히 지정해주는 어노테이션
정리하면 @Qualifier는 동일한 타입의 Bean이 여러 개 존재할 때
@Autowired와 함께 사용하여 주입할 Bean을 이름으로 명확히 지정하는 어노테이션이다.
❌ Bean 이름 착각 @Qualifier("AppleWatch") // ❌
➡ 실제 이름은 appleWatch
내가 이해한 걸 쉽게 정리하면
@Component
public class GalaxyPhone {

    private Watch watch;

    @Autowired
    public void setWatch(Watch watch) {
        this.watch = watch;
    }
}
@Component로 GalaxyPhone 객체를 생성하고,
@Autowired로 생성자에서 Watch를 주입(초기화)한 것이다.
'🍃 Spring' 카테고리의 다른 글
| 스프링 컨테이너의 구조 (0) | 2026.01.15 |
|---|---|
| @Component 계열 어노테이션 [ @Component | @Repository | @Service | @Controller ] (0) | 2026.01.14 |
| 의존성 주입(DI, Dependency Injection)와 생성자 주입, 세터 주입 (0) | 2026.01.14 |
| MySQL 설치하기 ( Workbench 툴 사용 ) (0) | 2026.01.13 |
| 🌺 Spring 시작하기.. 구조와 원리 (init-method="initMethod") (0) | 2026.01.13 |